控件开发
本文目标
以从零开始,带大家写一个自定义控件。
- 自定义控件开源地址:https://gitee.com/gutega/Vodka/tree/master/widgets/
- 对于自定义控件,本文可能存在遗漏的细节,如有疑惑,请参考已开源控件源码。
- 请结合example控件源码,进行理解与修改。
推荐开发环境
- 本软件主体使用Qt5.14.2开发,Qt下载地址:Qt5.14.2
- 建议使用Qt中自带的集成开发环境——QtCreator 编辑QML文件,对于QML官方内置组件,可以将鼠标悬浮在组件名称上按下F1,查看文档。
- 为避免您所使用的QML组件未在Qt5.14.2中加入,出现不兼容问题,建议不要使用比5.14.2更高版本的Qt.
调试方法
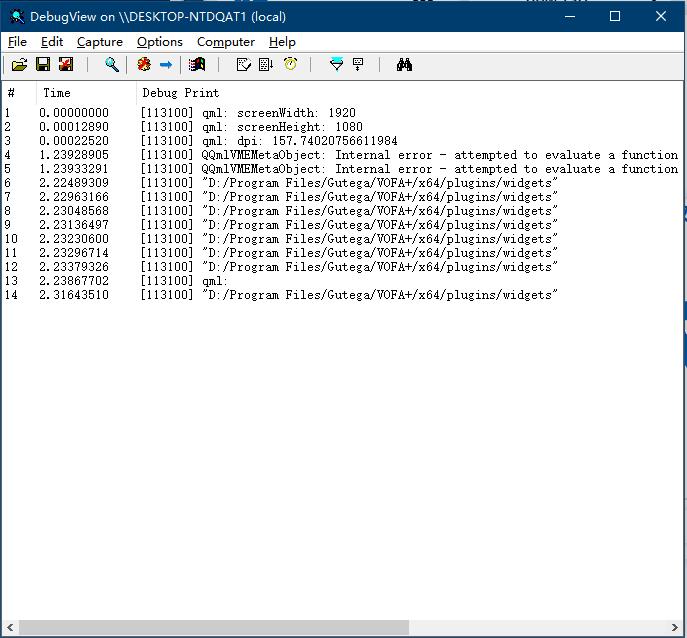
- 运行DebugView之后,再运行VOFA+,可以在DebugView中查看到VOFA+打印的调试信息;
- 下载地址:DebugView
- 在控件代码中,运行console.log("你的调试信息"),可以打印调试信息,也可以打印软件本身运行错误的信息。
Hello Widget
danger
- 每次修改控件代码之后,需要将VOFA+重启之后才能生效。
- 控件外观发生改变后,左侧控件栏的缓存图片不会立刻改变,请点击左侧控件栏上方的刷新按钮进行手动刷新;
步骤1:添加一个最简单的控件
在软件的plugins/widgets目录,创建一个example目录,添加一个example.qml文件:
example文件里的内容如下:
重启VOFA+,你会发现控件列表里多了一个蓝色方框,通过拖拽,可以将控件添加到控件窗口中,而且已经能够响应一些鼠标事件。正常关闭软件再重启,你还会发现控件的状态得到保存了。

上面的代码中:
ResizableRectangle属于MyModules,是一个可以用鼠标进行缩放、支持鼠标响应和全屏的矩形;MyModules由import MyModules 1.0导入,是VOFA+自行实现的一些qml类的合集。
property string path: "example"- 不可省略,它的值需要跟控件的目录名称一致。因为控件添加到画布之后,需要这个值来记录控件的来源;g_settings.applyVScale,g_settings.applyHScale- 纯像素的尺寸在不同尺寸的屏幕上表现为不同的大小,这两个函数用于适配不同尺寸的屏幕;get_widget_ctx,set_widget_ctx,这两个函数由VOFA+的控件系统调用,用于保存和恢复控件状态;get_ctx()- 是ResizableRectangle这个qml类的内置函数,获取了ResizableRectangle的上下文,包括宽高、坐标、是否全屏等信息。__set_ctx__是一个系统函数,函数原型:__set_ctx__(target, ctx, ref=null);get_widget_ctx函数返回的值中,拥有一个由固定结构对象组成的ctx数组,它们会作为__set_ctx__函数的第二个参数传入。- 以下结构,用于保存控件参数:"ctx": {<target>: { <property>: <value> },...}
__set_ctx__会穷举ctx数组中的每一项:- 如果target的值为'.',就会把value值赋予
__set_ctx__函数调用者的proerpty属性;- 在上面的例子中,
__set_ctx__(root, ctx.ctx);会把get_ctx()赋值给ResizableRectangle的ctx属性; ctx是ResizableRectangle的内置属性,当它的值发生改变,会自动恢复此上下文。
- 在上面的例子中,
- 如果target的值不为'.',就会从
ref引用对象中,寻找名称为'ref_' + target的引用对象,把V值赋给该对象名称为property的属性;ref引用对象下文会讲。
- 如果target的值为'.',就会把value值赋予
步骤2:添加右键菜单
添加完控件,我们会发现添加的控件无法删除,所以在example.qml中添加监听鼠标时间,并弹出删除控件选项的代码。
重启软件,你会发现点击鼠标右键,会弹出删除菜单了。

上面的代码中:
MyMenu,DeleteMenuItem- 是MyModules的内容:MyMenu是一个漂亮的、长宽会自适应的弹出式菜单;DeleteMenuItem是一个带有删除qml对象功能的菜单按钮,需要指定一个target对象为删除目标;
ResizableRectangle开放了一个MouseArea对象mouse,通过Connections可以监听它的点击事件;当检测到右键点击,就弹出菜单。
步骤3:绑定数据
控件获取到数据之后,才真正的跟VOFA+主体软件建立联系,我们把代码再改造一下,加入ChMenu、和显示通道数据的文本:
重启软件,你会发现点击鼠标右键,多了绑定通道的按钮,绑定I0通道之后,文本变成红色、并且显示文字和数字。

上面的代码中:
ChMenu- 是MyModules的内容:ChMenu会跟VOFA+的采样数据通道同步更新;bind_obj是ChMenu开放出来的已绑定数据对象,未绑定数据时bind_obj为null;绑定数据后,bind_obj拥有以下属性:string name- 名称color color- 颜色real scale- 比例real yoffset- Y轴偏置int xoffset- X轴偏置int decimal- 小数位数real value- 数据值
- 以下是
ref引用对象的写法,使用Loader的方式,只有在调用__set_ctx__的时候,引用对象才被实例化,节省内存:property Item ref: Loader {active: falsesourceComponent: Component {Item {// ref_<对象id>:对象idproperty var ref_ch_menu: ch_menu}}} - 把ch_menu的上下文加入ctx数组,这样就能保存数据绑定的信息了function get_widget_ctx() {var ctx = {"path": path,"ctx": {...'ch_menu': {'ctx': ch_menu.get_ctx()},}}return ctx;}
步骤4:绑定命令、参数
控件跟命令绑定之后,可以在控件里直接发送命令,我们把代码再改造一下,加入CmdMenu、ArgumentMenu和鼠标按下、抬起发送命令的响应事件:
重启软件,你会发现多了绑定命令、发送参数的子菜单。
danger
- 发送命令测试时,请打开数据接口,软件也会有小动画提醒需要打开数据接口。
未绑定命令的情况下:
- 按下控件:发送
"example:1\n" - 抬起控件:发送
"example:0\n"

绑定命令的情况下:
- 按下控件:发送
"你好:1\n" - 抬起控件:发送
"你好:0\n"

上面的代码中:
CmdMenu- 是MyModules的内容:CmdMenu会跟VOFA+的命令同步更新;bind_obj是CmdMenu开放出来的已绑定命令对象,未绑定CmdMenu时bind_obj为null;绑定数据后,bind_obj拥有以下属性:string name- 名称bool hex_on- 是否Hex模式bool loop_on- 是否允许加入循环发送队列int loop_ms- 组发送延时string cmd_hex- 命令十六进制表示
ArgumentMenu- 是MyModules的内容- 可以通过
ListModel传递参数设置,每个参数有以下几个属性:name- 名称float_value- 浮点模式参数值hex_value- 十六进制模式参数值enabled- 是否使能changable- 是否允许在右键菜单中修改
- 可以通过
sys_manager.send_command,VOFA+插件系统中用于发送命令的函数- 函数原型// name:控件名称,// cmd:命令对象,一般为CmdMenu.bind_obj// arg:参数对象,一般从ArgumentMenu的ListModel中获取// arg_hex_on:命令是否是Hex模式function send_command(name, cmd, arg, arg_hex_on);
- 典型的发送命令代码,将
cmd_menu已绑定的命令对象和从argument_model获取指定index的参数对象传入;function send_command(argment_index) {var press_argument = argument_model.get(argment_index);sys_manager.send_command("example",cmd_menu.bind_obj,press_argument,argument_menu.hex_on);} - 如果
cmd_menu.bind_obj为null,也就是未绑定命令,命令默认为name:<参数>\n(Float mode); - 如果
cmd_menu.bind_obj不为null,也就是有绑定命令,命令将根据参数替换规则被赋值后发出。
- 函数原型
图片支持
参考Image控件中显示图片的方法:
上面的代码中:
- 访问id为
img_index的图片通道,就是将图片的source属性设置为"image://data/" + img_index; - 设置
img_index为-1,就可以显示默认图片; - 要监听
sys_manager的need_update信号,然后重新设置source刷新图片。
API
sys_manager
sys_manager是VOFA+开放出来的接口,提供了自定义控件跟VOFA+沟通的桥梁。
属性:
bool connected- 是否已连接硬件
bool sending- 是否正在下发指令给下位机
int image_count- 图片通道数量
var file_reader- 文件操作接口,拥有以下成员:source- 设置路径。
QString read();- 从source路径文件数据,并使用'utf-8'转换成字符串。
QByteArray read_raw();- 从source路径文件读数据。
bool write(const QString& data);- 往source路径文件写data字符串,用'utf-8'转码。
bool write_raw(const QByteArray& data);- 往source路径文件写data。
static QString read(const QString& path);- 从path路径文件读数据,并使用'utf-8'转换成字符串。
static bool write(const QString& path, const QString& data);- 往source路径写data字符串,用'utf-8'转码。
bool append(const QString& data);- 往source路径追加data。
bool copy_to(const QString& path);- 将source路径文件复制到path路径。
bool cut_to(const QString& path);- 将source路径文件剪切到path路径。
bool exist(const QString& path = "");- path路径文件是否存在。
bool remove(const QString& path);- 删除path路径文件。
bool rename(const QString& path);- source路径文件重命名为path
bool mkdir(const QString& path);- 创建path路径文件。
QStringList filesInDirectory(const QString& path);- 返回path目录下所有文件名。
QString applicationDirPath();- 应用路径。
property var three_tools- 3d运算辅助函数:QList<qreal\> bounding_positioin(Qt3DRender::QMesh *mesh, QVector4D quaternion, QVector3D position_offset, qreal scale=1.0);- 获取模型的外框参数,返回长度为9的数组,返回值:
- 0~2 模型中心本地坐标;
- 3~5 模型在模型坐标系X、Y、Z轴的长度;
- 6~8 模型在世界坐标系X、Y、Z轴的长度。
- 获取模型的外框参数,返回长度为9的数组,返回值:
- static QVector4D CrossProduct(QVector4D a, QVector4D b);
- 4维向量叉乘
property string config_path- 软件配置目录。
信号:
signal name_changed(var index, string name)- 第index个采样数据通道名称改变了。
signal color_changed(var index, color color)- 第index个采样数据通道颜色改变了。
signal need_update()- 数据刷新了。
函数:
function send_string(data, arg=undefined);- 使用utf-8编码将data转换为数据发送。
function send_hex(data, arg=undefined);- 发送十六进制,data为字符串格式,如"00 01 02 03 04 05";
- 如果arg不为undefined,就会替换data中的%%。
function send_command(name, cmd, arg, arg_hex_on);- 发送命令
name:名称;cmd:命令对象,一般为CmdMenu.bind_obj;arg:参数对象,一般从ArgumentMenu的ListModel中获取;arg_hex_on:命令是否是Hex模式;- 如果
cmd为null,也就是未绑定命令,命令默认为name:<参数>\n(Float mode); - 如果
cmd不为null,也就是有绑定命令,命令将根据参数替换规则被赋值后发出。
function open_color_dialog(target_obj, parameter, color);- 打开颜色设置界面,设置
target_obj名字为parameter属性的颜色。
- 打开颜色设置界面,设置
g_settings
控件通过g_settings可以获取一些系统全局参数。
注意
全局参数只允许读,如果在控件中对它们进行修改,会造成意想不到的情况。
属性:
int fontPixelSizeTiny- 字体像素尺寸:极小int fontPixelSizeSmall- 字体像素尺寸:小int fontPixelSizeNormal- 字体像素尺寸:中int fontPixelSizeBig- 字体像素尺寸:大string fontFamily- 默认字体string fontFamilyNumber- 数字字体string fontFamilyAxis- 坐标轴字体string fontFamilyTerm- 收发区(命令行)字体
函数:
纯像素的尺寸在不同尺寸的屏幕上表现为不同的大小,以下函数用于适配不同尺寸的屏幕:
function applyHScale(size);- 水平像素适配。
function applyVScale(size);- 垂直像素适配。
function applyFontScale(size);- 字体像素尺寸适配。
appTheme
控件通过appTheme可以获取一些关于软件主题的信息。
注意
主题参数只允许读,如果在控件中对它们进行修改,会造成意想不到的情况。
属性:
goodColor- 友好颜色badColor- 警告颜色iconColor1- 图标1颜色iconColor2- 图标1颜色iconColor3- 图标1颜色iconSColor1- 图标1颜色-已选中iconSColor2- 图标1颜色-已选中iconSColor3- 图标1颜色-已选中objColor- 实体对象颜色(如Cube)color bgColor- 背景颜色color mainColor- 主标题颜色color barColor- 功能栏颜色color lightColor- 开关灯颜色color lineColor- 分割线颜色color fontColor- 普通字颜色color cbColor1- 色条颜色1color cbColor2- 色条颜色2color cbColor3- 色条颜色3color cbColor4- 色条颜色4string textAnsiTime- 文本区接收数据颜色string textAnsiRx- 文本区接收数据颜色string textAnsiTx- 文本区接收数据颜色string textAnsiErr- 文本区接收数据颜色